Rifle Zero Procedure & Sheet Instructions
You will have to be content with some level of error. Ultimately, the center of your shot group is an average of the rounds that you fire.
In an effort to keep this page as clean as possible, I have used the common acronyms for most terms.
Download Zero Sheets
Click the image to view or download
Zero in Meters
Click here to view or download
Zero in Yards
Zero Distance: 50 meters
Weapon: AR-15 with 14 1/2 inch barrel
Sights: Factory front sight post / GG&G BUIS (rear sight)
Note: This example does not reflect a preference of sights by gun-jutsu-training.com
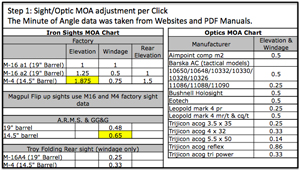
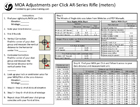
Elevation: 1.875
Windage: .65
Write down your MOA for both, elevation and windage. For back up and factory "iron sights" these elevation adjustment can be very different.
On the other hand, elevation and windage adjustments for optics are usually the same for both.
Note: If you are zeroing a sighting system for the first time, be sure to check the manual for Mechanical Zero settings.
2. Note your Zero Distance: 50 m
Some firing ranges have known distances marked by stakes, signs or lines on the ground. Be sure to note whether it is yards or meters. While the difference between yards and meters is relatively small, knowing it may save you some ammunition.
If you are using a range that is not marked, you'll have to pace, measure or laser range find the distance yourself.
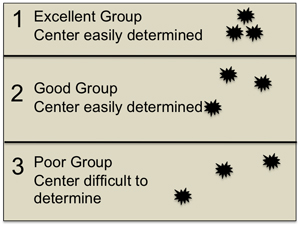
We are looking for a good tight shot group. Adjustments are made from an estimated center of the shot group.
With groups 1 & 2 we can easily determine the center of the group and make adjustments
Group 3 is a problem. You can adjust from this group, but unless the shooter tightens up, you could be zeroing for a while.
Some people like to fire a four or five round group in order to get a better approximation of where the center of the group is. That is a good technique but the target may become confusing very quickly if you don't mark your rounds well.
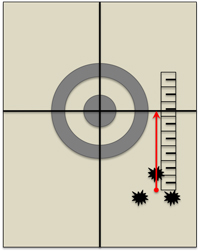
Find the center of your shot
group and measure the vertical
distance to the horizontal
center line: 5 1/8 inches

Find the center of your shot
group and measure the horizontal
distance to the vertical
center line: 3 1/4 inches
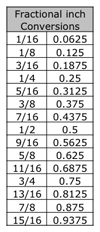
Before going on you may want to convert your fractional inches into decimal inches. A chart of common measurements has been provided for you.
Vertical: 5 1/8 inches = 5.125 inches
Horizontal: 3 1/4 inches = 3.25 inches
This will make it easier to figure out our number of clicks when we make our adjustments.
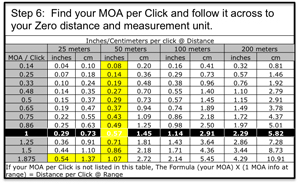
your MOA/CLICK at the zero distance
Elevation: 1.07
Windage: .37
The graphic to the right demonstrates looking up the elevation data.
If your MOA is not listed in the chart use the formula in the bottom box of the chart to find in/cm per click at distance.
# of clicks of elevation = Step 4 ÷ Step 6E
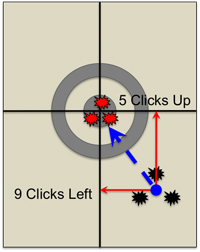
5.125 ÷ 1.07 = 4.78 round up to 5 clicks Up.
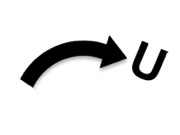
When making your elevation adjustments U for Up and the arrow indicates the direction to turn for RAISING the strike of the round. Down is opposite.
# of clicks of elevation = Step 5 ÷ Step 6W
3.25 ÷ .37 = 8.78 round up to 9 clicks to the left.
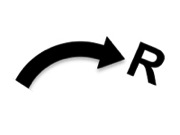
When making your windage adjustments R for Right and the arrow indicates the direction to turn for moving the strike of the round to the right. Left is opposite.
9. Repeat steps 3-8 until your shot group coincides with your point of aim
Depending on your consistency you should be able to zero in 9 rounds.
3 to establish a reference point for adjustments.
3 to check the adjustment.
3 to confirm.
This isn't to say that it will always be that easy. I once zeroed a brand new optic in only 40 rounds.
I would fire and adjust my brains out but couldn't get zeroed. Finally in frustration I fired 10 rounds on new paper (at the same Point of Aim) to see what was going on. My elevation was marginal but my windage was all over the place.
I was calling it quits when I grabbed the rifle by the brand new optic and felt it wiggle just a bit. It turns out that, while the sight was locked down to the rifle, the one-inch spacer I used for eye relief was loose. I tightened that down and was zeroed in 9 rounds.
Stuff happens, another time we had to zero an optic that was rotated 45 degrees in it's mount. It takes a bit of patience but it can be done.
When zeroing a rifle I find that these zero sheets, binoculars, a ruler and a calculator are very handy items to bring along.
Latest News
Connect &
Subscribe


The
Shop


Sponsors
Training